


Dark Chocolate Crinkle Cookies are a holiday favorite known by many names, such as Earthquake Cookies, or Snow On The Mountain Cookies
No matter what you choose to call them, they are the perfect cookie!
My family always made these for Christmas but they are fantastic all year round
Ready to get started? Jump straight to the recipe card by clicking the "jump to recipe" above. This post may contain affiliate links. Read our disclosure policy.

Ingredients needed
- Flour - use all-purpose flour
- Baking Powder - gives the cookies some lift
- Salt - salt always gives balance to sweet baked goods
- Unsweetened Chocolate - be sure to use dark unsweetened chocolate
- Sugar - use plain white sugar
- Vegetable Oil - or melted shortening
- Vanilla Extract - pure extract is best
- Eggs - this recipe needs 4 eggs and is a heavier wet dough
The beauty of Crinkle Cookies is that they are a cinch to make, and are almost foolproof. These are great to make with kids because of their simplicity. Fair warning: they are a bit messy to assemble because of the powdered sugar, but of course that is half the fun!

How to make Chocolate Crinkle Cookies:
NOTE: Plan to make the dough ahead of time because it needs to chill in the refrigerator for a minimum of 4 hours.
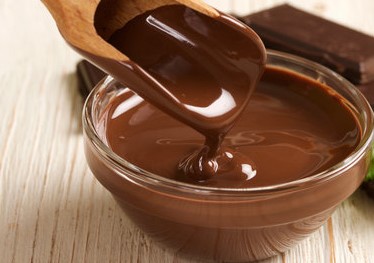
Step 1: Melt the chocolate
The easiest way to melt the chocolate is in the glass bowl you will be using for the whole recipe. Just pop in the microwave and heat in 30-second increments. It's very important to stir after each 30-second heat because the chocolate will hold its shape for a while, even when heated. Once you give it a stir it will likely already be nearly melted within one minute.
Alternatively, you can melt the chocolate gently over a double boiler on the stove.
Step 2: Combine Dry Ingredients
Combine flour, baking powder, and salt together in a small bowl and set aside. No need to sift the flour but give it a stir to remove any lumps.
Step 3: Combine Wet Ingredients
After you have melted the chocolate add the sugar, vegetable oil (or melted shortening), and Vanilla Extract. This will help cool the chocolate.
A note about shortening: My original recipe from my grandmother calls for Crisco shortening which was a very common ingredient in her day. I have successfully made these with vegetable oil, but they are fluffier with Crisco. You can choose what works best for you.
Step 4: Add the eggs
Add the eggs one by one. Adding eggs one by one allows the batter to really absorb the eggs, so don't skip this step. This is important in nearly any baking recipe. Gently combine after each egg addition.
Step 5: Add dry ingredients
Finally, add the flour mixture and gently blend until completely combined. Do not overmix! Too much stirring after adding flour can make any baked goods less tender.

Step 6: Cover the Batter and Chill for 4 - 12 hours
This dough is very sticky and must be chilled. Once you start rolling the cookies try to work quickly. The dough should still be cold when the cookies go into the oven. If they aren't cold they will become flat while baking.
Baked goods need to chill in the refrigerator for a few reasons:
- Cold dough makes handling easier. This dough is sticky.
- Cold fats (oil or butter) melt less quickly allowing the cookie to hold its shape in the oven.
- Resting the dough allows the flour to absorb all the moisture (from the eggs and oil) which results in a more even cookie. Crispy on the edges and softer in the middle.

Step 7: Rolling and Baking the Cookies
Sift powdered sugar into a shallow bowl to remove lumps.
Using a small cookie scoop, or two small spoons, working in batches, roll dough into small balls, about 1" in size
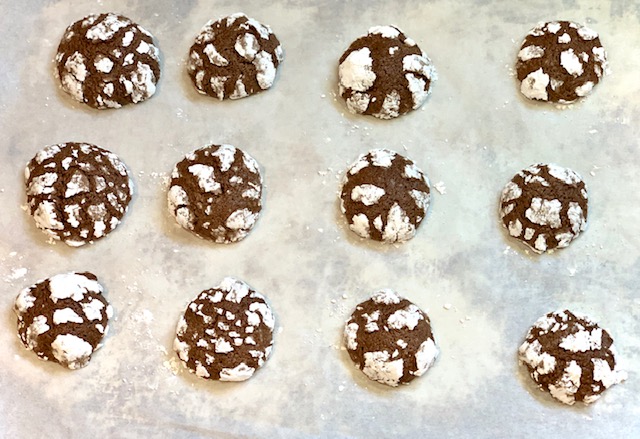
Roll the entire ball into powdered sugar. Make sure to coat the entire cookie. Place on baking sheet about 2" apart. Do not flatten!

Bake for about 10-11 minutes. Cookies will lose most of their shine when they are finished. Allow to rest on baking pan for 1-minute then transfer to a wire cooling rack to finish cooling for about 15-30 minutes.

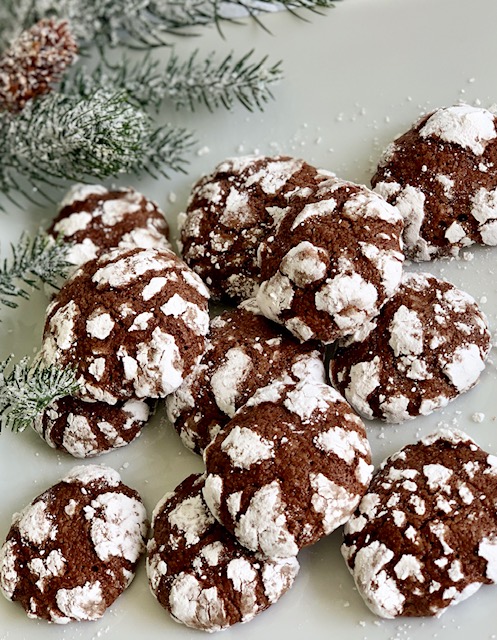
What are Chocolate Crinkle Cookies?
These cookies are a super fudgy dark chocolate cookie that is rolled in powdered sugar before baking. When they bake the top of the cookies burst a little and so they look like a snowy mountain.
Storing and freezing Chocolate Crinkle Cookies:
- Be sure to let the cookies cool completely for at least 30 minutes.
- The best way to store them and preserve the beautiful look of the cookies is to store them on their side, instead of on top of each other, in an air-tight container.
- These cookies freeze very well after they are baked, in an air-tight container, for up to 3 months.
- You can also store the rolled cookie dough in the freezer for up to 3 months. Let them thaw for about 10 minutes, roll in powdered sugar, and bake as directed above.

Ready to make your own Vanilla Extract?
It's super easy and we have a great recipe to help you. Just 2 ingredients are all you need.
Ready to try some other sweet treats?
- Easy Drop Sugar Cookies are great year around and the addition of gorgeous sprinkles will make them ideal for any holiday
- One Bowl Espresso Brownies are super fudgy and rich
- Baked Churro Donuts are the perfect combo of a churro and a no-yeast donut with lots of cinnamon and sugar
- Mexican Wedding Cookies have a soft melt-away texture and a nutty flavor and are gorgeous on a holiday cookie platter
Want to Save This Recipe?
Enter your email & We'll send it to your inbox. Plus, get great new recipes from us every week!
By submitting this form, you consent to receive emails from The Art of Food and Wine.

Dark Chocolate Crinkle Cookies
Ingredients
- 2 cups all-purpose flour
- 2 teaspoon baking powder
- ½ tsp salt
- 4 ounces unsweetened chocolate, melted
- 2 cups sugar
- ½ cup vegetable oil or shortening melted and cooled
- 2 teaspoon vanilla extract
- 4 eggs
- 2 cups powdered sugar, sifted
Instructions
- Combine flour, baking powder and salt together in a small bowl and set aside.
- Melt chocolate in a large microwave-safe bowl in 30-second increments, stirring until melted, or melt in a small pan on low heat.
- Add to melted chocolate the sugar, vegetable oil (or melted shortening) and vanilla. Mix well until combined.
- Add in eggs, one by one, mixing after each addition.
- Add in flour mixture, stirring gently until fully combined. Do not over mix!
- Cover and chill dough overnight or at least 4 hours.
- Once the dough is fully chilled preheat oven to 375°F
- Prepare 2 baking sheets by lining with parchment paper or lightly greasing.
- Sift powdered sugar into a shallow bowl.
- Using a small cookie scoop, or two small spoons, working in batches, roll dough into small balls.
- Roll entire ball into powdered sugar. Make sure to coat the entire cookie.
- Place on the prepared baking sheets. Do not flatten.
- Bake for 10-11 minutes. Cookies are done when the sides are firm and the tops are just slightly shiny. Rest on the baking sheet for 1-minute.
- Cool completely on wire rack. Store in a covered container.
Notes
- Melted shortening can be used in place of oil.
- A note about shortening: My original recipe from my grandmother calls for Crisco shortening which was a very common ingredient in her day. I have successfully made these with vegetable oil, but they are fluffier with Crisco. You can choose what works best for you.
Teresa
These cookies are so very festive and really easy to make. I made them for my cookie exchange party and they were quite a hit. I really enjoy the helpful tips from a trained chef, so now I read all the helpful tips before I jump directly to the recipe.
Cyndy
Teresa - we appreciate you stopping by and thank you for the kind words!
Simptreat.Com
What could make a sugar cookie even more delicious? How about cocoa powder and melted semisweet chocolate?
Jayne
Thanks! So much chocolatey goodness!
Adrianne
Yes!! I love cookies and yours are just perfect!! The ingredients sound so simple and easy and yet they look awesome! TGood idea to use the cookie scoop. Thanks for sharing.
Jayne
Adrianne, thanks for stopping by! I hope you will love these as much as we do!
Emmeline
I've been looking for what cookies to make this year for christmas - I always try to find some new kind to try in addition to the classics. This is it!! They looks so good, and pretty simple to make. Thank you!
Jayne
Thank you Emmeline and I think you will love these. They are fun and easy to make!
Farah
These are definitely going to be my holiday cookies! They look so fudgey and decadent 🙂
Jayne
Thank you Farah. They are decadent and so fun to make!
Beth
I love finding recipes that are fun and easy to make and eat with my kiddos! This is just that kind of recipe!
Jayne
Thanks Beth ~ the kiddos will love this one! I hope you like them.
Haley D. Williams
A Christmas cookie classic!
Jayne
Yes, our favorite! Thanks for stopping by!